Intex Ladder Instructions: A Comprehensive Guide
Navigating Intex pool ladder assembly, installation, and upkeep is crucial for safe enjoyment. This guide details each step, from component identification to troubleshooting common issues.
Understanding Your Intex Pool Ladder
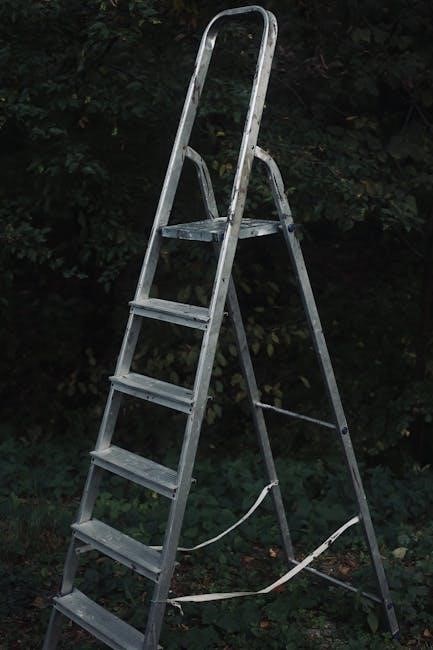
Intex pool ladders are designed to provide safe and convenient access to your above-ground swimming pool. However, many users find the included ladders somewhat flimsy, particularly for rectangular pools, noting issues with curved bottom edges affecting stair fit.
These ladders typically accommodate pools with a 52-inch wall height and feature removable steps for enhanced safety and ease of storage when the pool isn’t in use. The steps easily snap and lock into place for quick re-installation. Understanding the ladder’s limitations and potential for wobbling – often addressed with aftermarket upgrades like the Confer 7200 or sandbag weighting – is vital before beginning assembly.
Ladder Components and Identification
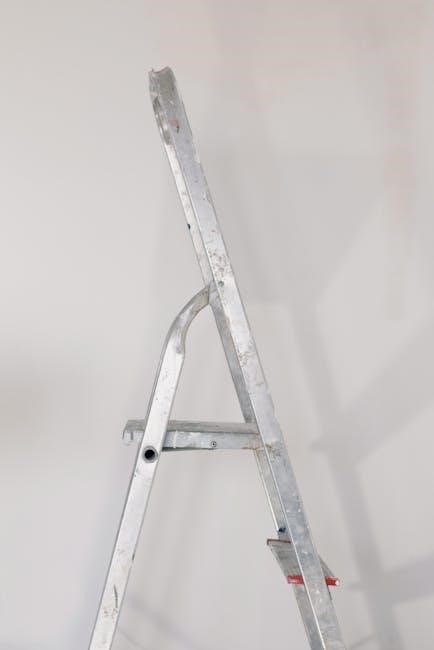
An Intex pool ladder generally consists of several key components. These include the ladder base, which provides stability and rests on the pool deck; the side rails, forming the ladder’s upright structure; and the steps themselves, designed for secure footing. A top rail connects the side rails, offering a handhold for entering and exiting the pool.
Identifying these parts is the first step towards successful assembly. While Intex provides replacement parts, locating the correct part number can be challenging, as indicated by the “no products listed” status on their website for specific models. Rubber plugs and safety bumpers are also crucial components, enhancing safety and preventing damage to the pool.
Safety Precautions Before Assembly
Prioritizing safety during Intex ladder assembly is paramount. Always ensure the assembly area is clear of obstructions and on a level surface. Inspect all components for damage before beginning; do not use damaged parts. Be mindful of the ladder’s weight and enlist assistance if needed to prevent strain or injury.
Consider the pool’s depth – the ladder is designed for 52-inch walls, so ensure compatibility. A warning regarding reproductive harm due to BPA is present on some models, highlighting the importance of careful handling. Remember that some users report wobbling even with upgraded ladders, suggesting additional stabilization may be necessary.
Assembly Instructions: Step-by-Step
Follow these instructions carefully for secure assembly. The process involves attaching side rails, installing steps, and connecting the top rail for a stable structure.
Step 1: Attaching the Side Rails to the Base
Begin by laying the ladder base flat on a protected surface. Identify the left and right side rails – they are typically marked. Align the side rails with the corresponding slots or connection points on the ladder base.
Securely attach the side rails to the base using the provided pins or bolts. Ensure these are fully inserted and locked into place; a firm connection is vital for stability. Double-check that both rails are firmly attached and level before proceeding.
Some models may require a slight angling of the rails during attachment. Refer to your specific Intex ladder’s diagram for precise guidance. A wobbly base at this stage indicates a loose connection that needs immediate attention.
Step 2: Installing the Steps
With the side rails secured to the base, it’s time to install the steps. Intex ladders often feature easily removable steps for storage or maintenance. Align each step with the designated slots on the side rails.
Gently but firmly press each step into its slot until you hear a distinct “snap” or click, indicating it’s locked into place. Ensure each step is securely fastened and doesn’t wobble. Regularly check this locking mechanism throughout the season.
If steps are difficult to install, double-check alignment and avoid excessive force. Some models require a slight upward angle during insertion. Remember, secure steps are paramount for safe pool access!
Step 3: Connecting the Top Rail to the Side Rails
Once the steps are firmly in place, connect the top rail to complete the ladder’s structure. The top rail typically attaches to the side rails using provided connectors or pins. Align the holes in the top rail with those in the side rails.
Insert the connectors or pins, ensuring they pass completely through both rail sections. Some models may require tightening screws or clips for added security. Verify the top rail is level and securely fastened to both side rails, preventing any instability.
A properly connected top rail provides crucial support and a handhold for users. Double-check all connections before using the ladder, prioritizing safety and stability.
Ladder Installation and Securing
Proper ladder placement and securing are vital for safety. Position the ladder on a level surface and, if possible, attach it to the pool frame for stability.
Positioning the Ladder Correctly
Ensuring correct ladder positioning is paramount for safe pool access; Begin by selecting a level area adjacent to your Intex pool, avoiding any slopes or uneven ground. The ladder should be placed directly opposite the pool’s widest side for optimal entry and exit.
Carefully align the ladder steps with the pool’s top rail, ensuring a comfortable and secure transition. Avoid positioning the ladder too close to the pool wall, as this can create a cramped and potentially hazardous entry point.
Consider the surrounding area; clear any obstacles like furniture or landscaping that could impede access. Remember, a stable and well-positioned ladder significantly reduces the risk of accidents.
Securing the Ladder to the Pool Frame (If Applicable)
For enhanced stability, some Intex ladder models allow attachment to the pool frame. Examine your ladder and pool frame for designated connection points – typically brackets or slots. If present, utilize the provided hardware (pins, bolts, or straps) to firmly secure the ladder to the frame.
This connection minimizes wobbling and prevents the ladder from shifting during use. Ensure all fasteners are tightened securely, but avoid over-tightening, which could damage the plastic components.
If your ladder doesn’t have direct frame attachment points, consider alternative stabilization methods, like weighted bases. Regularly inspect the connection points for any signs of wear or loosening.
Adding Weight for Stability (Sandbags)
To further enhance ladder stability, especially on uneven ground or for larger pools, consider adding weight to the base. Sandbags are a readily available and effective solution. Place filled sandbags – approximately 10-20 pounds each – on the ladder’s base, distributing the weight evenly across the steps.
Ensure the sandbags are securely positioned and won’t easily tip over. Alternatively, you can use water-filled containers, but be mindful of potential leaks.
This added weight counteracts tipping forces and provides a more secure climbing experience. Regularly check the sandbags for damage or leaks, and replenish sand as needed to maintain optimal weight distribution.
Maintenance and Care
Regularly inspect your Intex ladder for wear and tear, cleaning it with mild soap and water. Promptly replace any damaged steps to ensure safety.
Regular Inspection for Wear and Tear
Consistent inspection is paramount for maintaining a safe Intex pool ladder. Before each swimming session, visually examine all ladder components. Pay close attention to the steps, side rails, and connections for any signs of cracking, rust, or deformation.
Feel for looseness in bolts and connections, tightening them as needed. Check the rubber bumpers or plugs on the ladder base; these can degrade over time and require replacement. Inspect the points where the ladder contacts the pool wall for any signs of abrasion. Addressing minor issues promptly prevents them from escalating into larger, more dangerous problems. A proactive approach to inspection extends the ladder’s lifespan and safeguards swimmers.
Cleaning the Ladder
Regular cleaning prevents grime buildup and maintains the ladder’s structural integrity. After removing the ladder from the pool (when not in use, if removable steps are present), rinse it thoroughly with a garden hose to eliminate dirt, algae, and chemical residue.
For stubborn stains, use a mild soap solution and a soft brush; avoid abrasive cleaners that could damage the plastic or metal components. Pay particular attention to the step surfaces, where algae can accumulate. Ensure all soap residue is completely rinsed away before storing or reinstalling the ladder. Proper cleaning not only enhances appearance but also prevents slippery surfaces and corrosion, contributing to long-term safety and durability.
Replacing Damaged Steps
Promptly replacing damaged steps is vital for pool safety. Inspect steps regularly for cracks, breaks, or significant wear. Intex offers replacement steps, often available through their website or retailers like Amazon. When ordering, identify the correct part number for your specific ladder model to ensure compatibility.
Removal typically involves snapping the old step out of the ladder frame, and inserting the new one until it locks securely into place – as described in the original assembly instructions. Always double-check the new step is firmly attached before use. Ignoring damaged steps poses a serious fall risk, so prioritize replacements to maintain a safe swimming environment for all users.
Troubleshooting Common Issues
Addressing wobbling, attachment difficulties, or missing parts ensures ladder stability and safety. Solutions range from adding weight to sourcing replacements quickly.
Ladder Wobbling
A common concern with Intex ladders is instability, often manifesting as wobbling. Several factors can contribute to this issue, and thankfully, solutions are readily available. One frequently suggested remedy, discussed on Reddit’s r/AboveGroundPools, involves adding weight to the ladder’s base – specifically, utilizing sandbags placed on the lowest step.
This added weight significantly improves stability, counteracting the tendency to sway. However, some users report that even with sandbags, a degree of wobble may persist, particularly with the original, often-described as “flimsy,” Intex ladders. Upgrading to a more robust ladder, like the Confer 7200, is a worthwhile investment for enhanced stability and peace of mind. Ensure all connections are secure, as loose parts exacerbate wobbling.
Difficulty Attaching Steps
Encountering trouble securing the steps to your Intex ladder is a frequent issue reported by users. The Intex Deluxe Pool Ladder is specifically designed with easily removable steps for convenient storage when the pool isn’t in use. The attachment process involves simply setting the steps into the base and then “snapping and locking” them into place.
However, sometimes this locking mechanism can become stiff or misaligned. Ensure the steps are correctly oriented and apply firm, even pressure when attempting to snap them in. Inspect the step and base connection points for any debris or damage that might be hindering the process. If persistent difficulty arises, consider checking for compatible replacement steps directly from Intex Recreation Corp. or authorized retailers.
Missing Parts & Replacements
Discovering missing components or needing replacements for your Intex pool ladder can be frustrating. Intex Recreation Corp. offers replacement parts, but navigating their website reveals that, at times, specific ladder parts may show as “no products listed under this category” for certain pool models (like the Ultra XTR Frame).
Fortunately, alternative options exist. Amazon and other retailers frequently stock Intex ladder components. When ordering, accurately identifying the correct part number is vital. Refer to your original ladder documentation or the Intex website for diagrams and part lists. Reddit users in r/AboveGroundPools suggest Confer ladders as a more robust alternative, though they may require sandbag stabilization to minimize wobbling.

Finding Replacement Parts
Locating Intex ladder replacements involves checking the official Intex Recreation Corp. website, Amazon, and other retailers. Accurate part numbers are essential for compatibility.
Intex Recreation Corp. Website
The Intex Recreation Corp. website is the primary source for authentic replacement parts. Navigating their parts finder can be challenging, as listings sometimes indicate “no products listed” under specific ladder categories for certain pool models (like the Ultra XTR Frame pools – 24ft, 18ft, and 32ft).
However, it’s worth persistent searching using your pool model number (e.g., 26363EH, 26355EH, 28371EH) and “ladder” as keywords. You’ll need to identify the specific part you require – a step, rail, or complete ladder assembly.
Be prepared to potentially contact Intex customer support directly if the online system doesn’t yield results. They can assist in identifying the correct part number based on your pool and ladder details. Always verify compatibility before ordering.
Amazon and Other Retailers
Amazon offers a wider selection of Intex ladder replacements and aftermarket alternatives, often providing faster shipping than ordering directly from Intex. Confer ladders, like the 7200 model, are frequently recommended by users on platforms like Reddit (r/AboveGroundPools) as a sturdier upgrade for flimsy Coleman/Intex rectangular pool ladders.
However, be cautious about fit, especially with curved bottom pool walls. While Confer ladders generally improve stability, some wobbling may still occur, potentially requiring sandbag additions to the bottom step for enhanced security.
Other retailers may also stock Intex ladder parts, but availability can vary. Always compare prices and read customer reviews before purchasing.
Identifying the Correct Part Number
Accurately identifying the correct Intex ladder part number is vital for successful replacements. The Intex Recreation Corp. website lists parts, but often indicates “no products listed” under specific ladder categories for various pool models (Ultra XTR Frame, 24ft x 12ft x 52in ─ 26363EH, for example).
This can be frustrating, requiring careful cross-referencing. When contacting Intex customer support or searching retailer sites, have your pool model number readily available (e.g., 26355EH for an 18ft x 9ft x 52in Ultra XTR).
Examine existing ladder components for imprinted numbers. Detailed part breakdowns are sometimes available through online forums or specialized pool part websites.